Monday, July 31, 2017

Running Python Inside SQL Server

One of the valuable addition to data analytics by Microsoft was adding python into SQL server.Now SQL Server will support the two primary languages of Data Science within SQL Server R and Python. I am a fan of Python and  Python is near the top of the most popular programming language charts, many people are interested in learning more about it.  As many professionals are unfamiliar with Python, i wanted to this post about the same.

Installing Python in SQL Server


If you have already used R with SQL server then the process for using Python in SQL Server is very similar to it.  Microsoft renamed R Services to Machine Learning Services, and now allows both R and Python to be installed, as shown in the screen.  Microsoft’s version of Python uses Anaconda, which is an open source analytics platform created by Continuum. This is where Python differs from other open source languages, as Continuum is providing the version of Python as it contains data science components which are not included in the standard distribution of Python. Continuum also sells an enterprise version of Anaconda, with of course more features than come with the free version. Also it is mandatory and  important to remember the python environment as you will need select the same distribution when running Python code outside of SQL Server.

Configuration Changes for Python

The last thing needed to run Python is to configure and restart the SQL Server Services. In a new query type the following command

 sp_configure 'external scripts enabled', 1  
 GO  
 Reconfigure  
 GO  

After restarting the SQL Server Service, SQL Server will now run Python code. Since Python is easy to learn for even a novice developer. Code is easy to read and you can do a lot of things just by looking at it. Lets dig into python with sql server and do wonders with data analytics.

Saturday, July 15, 2017

Angular 4.3 Now released

Angular version 4.3 has been released. This is a very minor release.

What’s new?
  • It has HttpClient, a smaller, easier to use, and more powerful library for making HTTP Requests. Learn more about it from the docs
  • New router life cycle events for Guards and Resolvers. Four new events: GuardsCheckStart, GuardsCheckEnd, ResolveStart, ResolveEnd join the existing set of life cycle event such as NavigationStart
  • Conditionally disable animations via a new attribute, [@.disabled]
  • Support for the emulated /deep/ CSS Selector (the Shadow-Piercing descendant combinator aka >>>) has been deprecated to match browser implementations and Chrome’s intent to remove. ::ng-deep has been added to provide a temporary workaround for developers currently using this feature. 
Wondering what have changed ? For the complete list of features and bugfixes check the changelog.

Sunday, June 11, 2017

Build a select dropdown with *ngFor in Angular 2

One of the most repeated questions with angular2 i have come across Stack overflow is "how to generate a select dropdown with an array or object". Hence, i decided to write a sample post with sample code to ease the search.

I will be posting two samples with one simple array and other with object.

Assume you want to generate a dropdown select by having an array with years.

  years = ['2016','2015','2014'];  

The app.component.ts code will look like,

 import {Component} from '@angular/core';  
 import {Http} from '@angular/http'  
 import {bootstrap} from '@angular/platform-browser-dynamic';  
 import { Component } from './Component';  
 @Component({  
  selector: 'material-app',  
  templateUrl: 'app.component.html'  
 })  
 export class AppComponent {  
  years = ['2016','2015','2014'];  
  selectedyear = '2015' ;  
  onChange(year) {  
   alert(year);  
  }  
 } 

In the above cocde selectedyear indicates the default value of the dropdown whenever the app is loaded.  onChange is the event gets fired whenever a option is changed, you can capture the selected value with the event.

And the template  app.component.html will look as follows,
 

*ngFor is being used to repeat the items as options. It's simple as above.

DEMO USING ARRAY

Next we will see how to bind a object using *ngFor . Assume  if you have a object and want to bind the keys as drop down values,

 currencyList = {  
 "USD": {  
 "symbol": "$",  
 "name": "US Dollar",  
 "symbol_native": "$",  
 "decimal_digits": 2,  
 "rounding": 0,  
 "code": "USD",  
 "name_plural": "US dollars"  
 },  
 "CAD": {  
 "symbol": "CA$",  
 "name": "Canadian Dollar",  
 "symbol_native": "$",  
 "decimal_digits": 2,  
 "rounding": 0,  
 "code": "CAD",  
 "name_plural": "Canadian dollars"  
 }  
 };  

to get the keys of object you can use  Object.keys(this.currencyList); and the rest is same as above sample.

DEMO USING OBJECT


Sunday, June 4, 2017

ESLint with Visual Studio Code (vscode)

Poor code quality application can lead to many serious problems when the size of code grows. Linting is the process of checking the source code for Programmatic as well as Stylistic errors. This is most helpful in identifying some common and uncommon mistakes that are made during coding. To do this process many linters are out there like eslint, jshint, jslint etc.  


All the above helps us to be consistent in semicolons, quotes & code formatting etc. In this blog post i will be showing you how you can setup ESLint with visual studio code which is my favorite code editor.


Install ESLint global


Install it globally by using NPM by this command:

 npm install -g eslint  

Download ESLint extension 

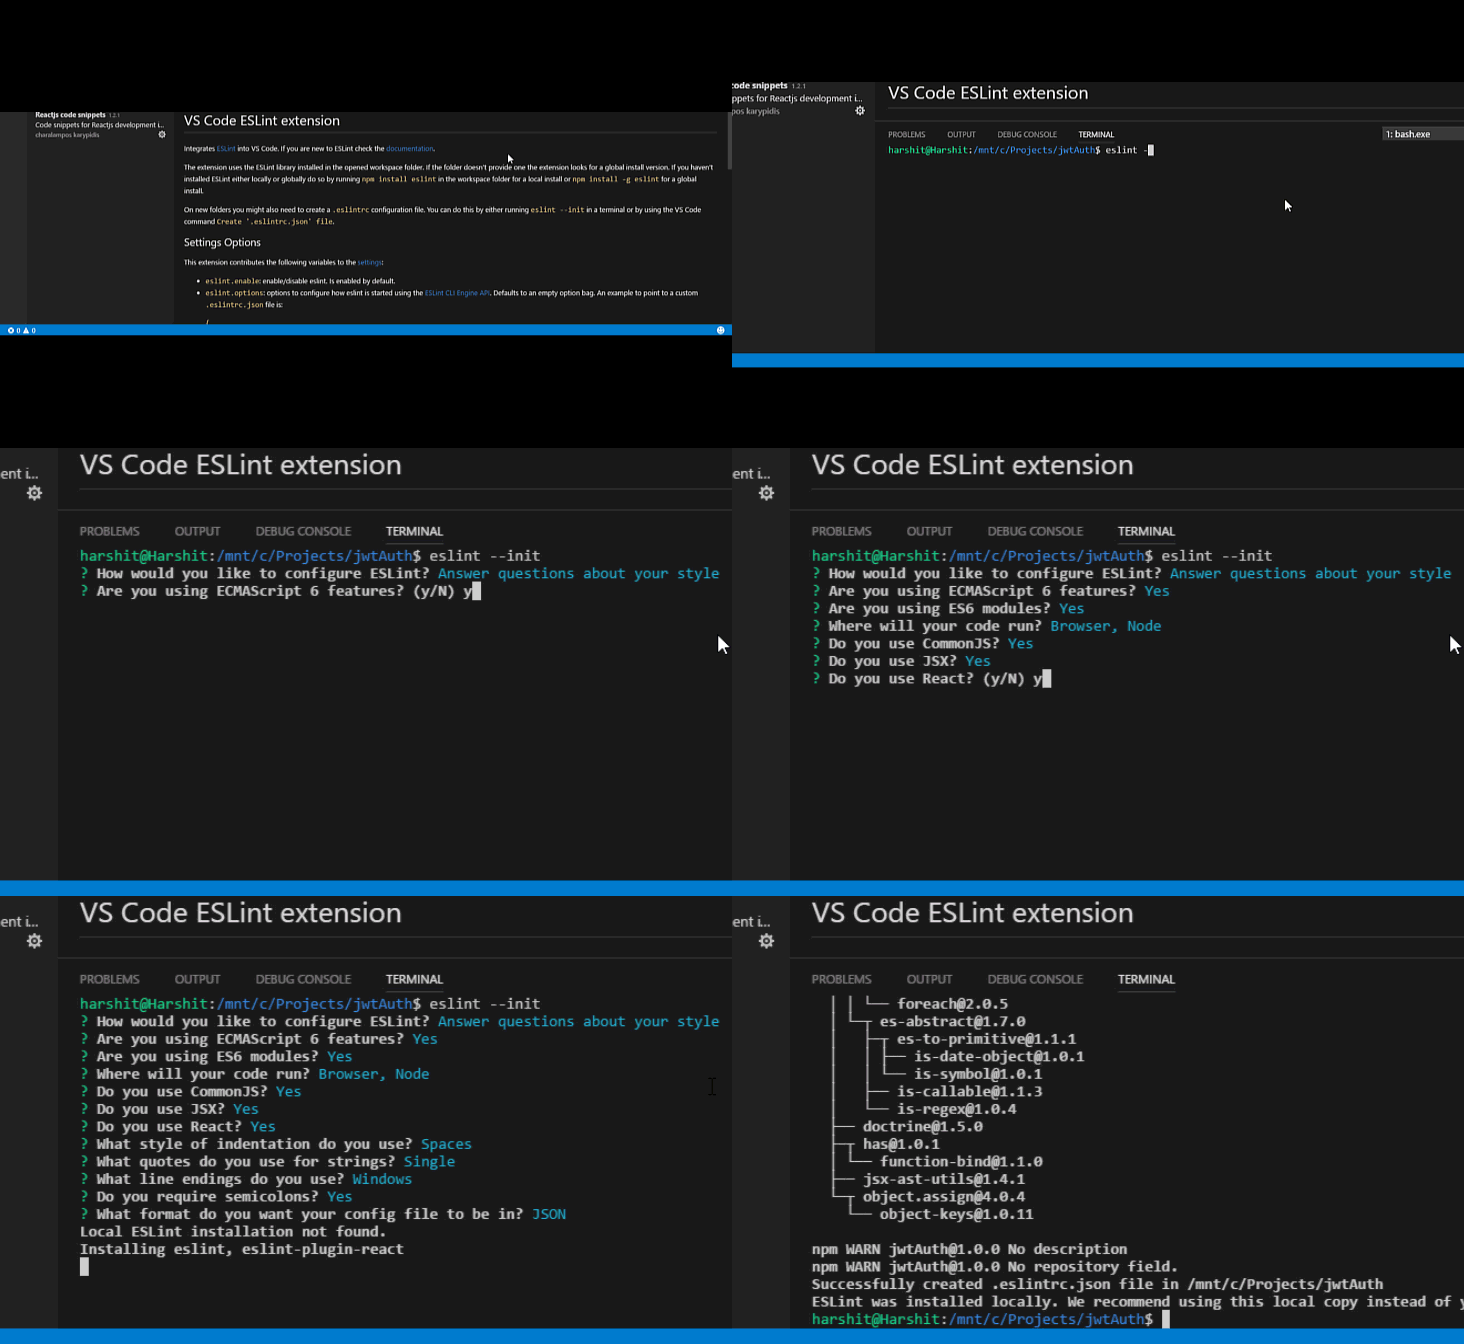
Install the ESLint by downloading the extension, as shown below,


After downloading we need to initialize the ESLint.

Initialize ESLint in project

Next is to initialize ESLint by using Ctrl + ` to open the terminal in Visual Studio Code


That's all folks, now your project is setup with ESLint, from now on it will be very easy to catch lint errors and fix them even if you had missed it. Let's see ESLint in action.


And if you want to explore more on ESLint you can explore it on the website http://eslint.org/

Saturday, June 3, 2017

How to copy a Database from a MongoDB instance to another?

While recently i was working in an application i had to copy the database from a mongoDB  hosted in an mlab instance to my local. I will share an easy step in MongoDB Shell which support to copy database from remote instance to current one with a single command.

DEMO with steps :

I made  two instances of MongoDB from following commands.
 //Instance 1  
 mongod --port 9998 --dbpath /data/db1  
 //Instance 2  
 mongod --port 9999 --dbpath /data/db2  

In instance 1 there is a database called "dsampledb1".
and i started the instance with the following command,

 mongo localhost:9998  

I create a database with one collection with the following command,
 use dsampledb1  
 db.users.save({id:1, name:"sample name"})  

Then I log in to next MongoDB instance using MongoDB Shell.
 mongo localhost:9999  

Now to copy the database from the instance 1 to instance 2 , we can simply use the following command,
 db.copyDatabase("dsampledb1","dsampledb2","localhost:9999")  

Syntax is as follows,
 db.copyDatabase(sourcedb, destinationdb, fromhost, username, password)  


A first-timer’s experience of Microsoft’s MVP Community Connection (MCC)

It was my first ever experience to participate in Microsoft's event outside Sri Lanka. My experience as a “first-timer” attending the South East Asia's MVP community connection, along with few other MVPs from my country. MVP Community Connection is a day to connect, learn, inspire and celebrate the local MVP community and MS employees.


It was an exclusive event especially organized for Asia pacific MVPs. The intention is to have all MVPs from different region join there and have a great time with others. There were some interesting sessions and networking between each other. 

From the moment I got off the plane at the Soekarno–Hatta International Airport Airport, I was very excited about the event. I was the first to arrive AYANA Midplaza JAKARTA 2 hours prior to the event. From the registration, greeted by Microsoft mvp tshirt and  I was escorted to pick up my personal registration badge and Wahoo!. 


First day started with lunch at the Hotel. Everyone had a very good time introducing ourselves in 1 minute with other MVPs.  There were totally around 50 MVPs from various countries in south east Asia and we were snuffled and divided into 7 teams for various activities and sessions. It was really awesome to meet with other MVPs and get some inputs, their works and other things related to personal and professional life. Later with a key note from Soyoung Lee, Community Program Manager on "MVPs for the year 2017 and latest updates". Then we had  hack a plan session on  various topics such as "Emerging Technologies", "Developer Field Presentation" etc andone of the best moment was the group photo .


 Later in the evening we were out for dinner where we had Indonesian varieties of food and MVPs were involved in presenting their culture in various ways.  Finally everyone had a great time and fun on the first day.  Second day, it started with a fantastic breakfast and a team activity , later there were  very productive intense discussions to improve MVP engagement within the Partner network. The day ended with a award ceremony where everyone who attended the session was given away with a cool gift. It was a tremendous experience I had at MVP community connect event at Jakarta,Indonesia. There were lots of things that i could learn from various MVPs. Also it created a very good channel with all other MVPs.